作者:Adam Freeman 翻译:陈广 日期:2018-9-2
本章,我继续构建 SportsStore 示例应用程序。我将添加应用程序导航支持,并开始构建购物车。
如果客户可以按类别浏览产品,那么该应用程序将更有用。我将分三个阶段完成这一工作。
ProductController类的List action 方法,让它可以在存储库中筛选Product对象我将从改进视图模型类ProductsListViewModel开始,它是在上一章加进 SportsStore 项目的。为了渲染侧边栏,我需要让当前类别与视图通信,并且这是一个很好的起点。清单9-1显示了我在 Models/ViewModels 文件夹中对 ProductsListViewModel.cs 文件所做的更改。
清单 9-1:Models/ViewModels 文件夹下的 ProductsListViewModel .cs 文件,添加属性
using System.Collections.Generic;
using SportsStore.Models;

namespace SportsStore.Models.ViewModels
{
    public class ProductsListViewModel
    {
        public IEnumerable<Product> Products { get; set; }
        public PagingInfo PagingInfo { get; set; }
        public string CurrentCategory { get; set; }
    }
}
我添加了一个名为CurrentCategory的属性。下一步是更新 Product 控制器,以便List action 方法按类别筛选Product对象,并使用我添加到视图模型中的新属性来指示已选择的类别。清单9-2显示了更改。
清单 9-2:控制器中的 ProductController.cs 文件,给List action 添加类别支持
using Microsoft.AspNetCore.Mvc;
using SportsStore.Models;
using System.Linq;
using SportsStore.Models.ViewModels;

namespace SportsStore.Controllers
{
    public class ProductController : Controller
    {
        private IProductRepository repository;
        public int PageSize = 4;
        public ProductController(IProductRepository repo)
        {
            repository = repo;
        }

        public ViewResult List(string category, int productPage = 1)
            => View(new ProductsListViewModel
            {
                Products = repository.Products
                    .Where(p => category == null || p.Category == category)
                    .OrderBy(p => p.ProductID)
                    .Skip((productPage - 1) * PageSize)
                    .Take(PageSize),
                PagingInfo = new PagingInfo
                {
                    CurrentPage = productPage,
                    ItemsPerPage = PageSize,
                    TotalItems = repository.Products.Count()
                },
                CurrentCategory = category
            });
    }
}
我对 action 方法做了三次修改。首先,我添加了一个名为category的参数。这个category参数被清单中的第二个更改所使用,它是对 LINQ 查询的增强:如果类别不是null,则只选择那些具有匹配Category属性的Product对象。最后一项更改是设置我添加到ProductsListViewModel类中的CurrentCategory属性的值。然而,这些更改意味着PagingInfo.TotalItems的值计算错误,因为它没有考虑类别筛选。我将在稍后修复这个问题。
单元测试:更新现存的单元测试
我更改了
Listaction 方法的签名,这将阻止一些现有的单元测试方法编译。为了解决这个问题,我需要在那些与控制器一起工作的单元测试中将null作为第一个参数传递给List方法。例如,在 ProductControllerTests.cs 文件中的Can_Paginate测试中,单元测试的操作部分如下所示:
...
[Fact]
public void Can_Paginate()
{
    // Arrange
    Mock<IProductRepository> mock = new Mock<IProductRepository>();
    mock.Setup(m => m.Products).Returns((new Product[] {
        new Product {ProductID = 1, Name = "P1"},
        new Product {ProductID = 2, Name = "P2"},
        new Product {ProductID = 3, Name = "P3"},
        new Product {ProductID = 4, Name = "P4"},
        new Product {ProductID = 5, Name = "P5"}
    }).AsQueryable<Product>());
    ProductController controller = new ProductController(mock.Object);
    controller.PageSize = 3;
    // Act
    ProductsListViewModel result =
        controller.List(null, 2).ViewData.Model as ProductsListViewModel;
    // Assert
    Product[] prodArray = result.Products.ToArray();
    Assert.True(prodArray.Length == 2);
    Assert.Equal("P4", prodArray[0].Name);
    Assert.Equal("P5", prodArray[1].Name);
}
...
通过对
category参数使用null,我接收控制器从存储库获得的所有Product对象,这与添加新参数之前的情况相同。我需要对Can_Send_Pagination_View_Model测试进行相同的更改。
...
[Fact]
public void Can_Send_Pagination_View_Model()
{
    // Arrange
    Mock<IProductRepository> mock = new Mock<IProductRepository>();
    mock.Setup(m => m.Products).Returns((new Product[] {
        new Product {ProductID = 1, Name = "P1"},
        new Product {ProductID = 2, Name = "P2"},
        new Product {ProductID = 3, Name = "P3"},
        new Product {ProductID = 4, Name = "P4"},
        new Product {ProductID = 5, Name = "P5"}
    }).AsQueryable<Product>());
    // Arrange
    ProductController controller =
    new ProductController(mock.Object) { PageSize = 3 };
    // Act
    ProductsListViewModel result =
        controller.List(null, 2).ViewData.Model as ProductsListViewModel;
    // Assert
    PagingInfo pageInfo = result.PagingInfo;
    Assert.Equal(2, pageInfo.CurrentPage);
    Assert.Equal(3, pageInfo.ItemsPerPage);
    Assert.Equal(5, pageInfo.TotalItems);
    Assert.Equal(2, pageInfo.TotalPages);
}
...
让单元测试与代码更改同步,在进入测试思维定式后,将成为第二天性。
要查看类别筛选的效果,请启动应用程序并使用以下查询字符串选择一个类别,更改端口以匹配 Visual Studio 为您的项目分配的端口(并注意在 Soccer 中使用大写字母 S):
http://localhost:60000/?category=Soccer
您将只看到 Soccer 类别中的产品,如图9-1所示。
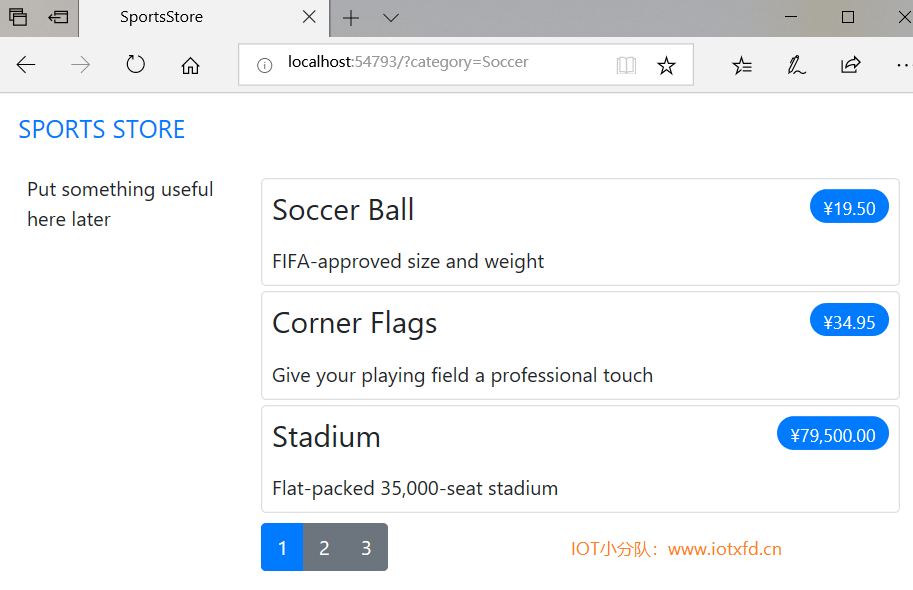 图9-1 使用查询字符串按类别筛选
显然,用户不希望使用 URL 来导航到类别,但是您可以看到,一旦基本结构到位,微小的更改会对 MVC 应用程序产生多大的影响。
单元测试:类别筛选
我需要一个单元测试来正确地测试类别过滤功能,以确保过滤器能够在指定的类别中正确地生成产品。下面是我添加到
ProductControllerTests类中的测试方法:
...
[Fact]
public void Can_Filter_Products()
{
    // Arrange
    // - create the mock repository
    Mock<IProductRepository> mock = new Mock<IProductRepository>();
    mock.Setup(m => m.Products).Returns((new Product[] {
        new Product {ProductID = 1, Name = "P1", Category = "Cat1"},
        new Product {ProductID = 2, Name = "P2", Category = "Cat2"},
        new Product {ProductID = 3, Name = "P3", Category = "Cat1"},
        new Product {ProductID = 4, Name = "P4", Category = "Cat2"},
        new Product {ProductID = 5, Name = "P5", Category = "Cat3"}
    }).AsQueryable<Product>());
    // Arrange - create a controller and make the page size 3 items
    ProductController controller = new ProductController(mock.Object);
    controller.PageSize = 3;
    // Action
    Product[] result =
        (controller.List("Cat2", 1).ViewData.Model as ProductsListViewModel)
            .Products.ToArray();
    // Assert
    Assert.Equal(2, result.Length);
    Assert.True(result[0].Name == "P2" && result[0].Category == "Cat2");
    Assert.True(result[1].Name == "P4" && result[1].Category == "Cat2");
}
...
此测试创建一个包含属于一系列类别的
Product对象的模拟存储库。使用 action 方法请求一个指定类别,并检查结果以确保结果是正确的对象。
没有人希望看到或使用丑陋的 URL,如/?category=Soccer。为了解决这个问题,我将更改Startup类的Configure方法中的路由配置,以创建一个更有用的 URL 集,如清单9-3所示。
警告:重要的是按照显示的顺序添加清单9-3中的新路由。路由会按照定义的顺序应用,如果更改顺序,则会得到一些奇怪的效果。
清单 9-3:SportsStore 文件夹下的 Startup.cs 文件,更改路由架构
...
public void Configure(IApplicationBuilder app, IHostingEnvironment env)
{
    app.UseDeveloperExceptionPage();
    app.UseStatusCodePages();
    app.UseStaticFiles();
    app.UseMvc(routes =>
    {
        routes.MapRoute(
            name: null,
            template: "{category}/Page{productPage:int}",
            defaults: new { controller = "Product", action = "List" }
        );

        routes.MapRoute(
            name: null,
            template: "Page{productPage:int}",
            defaults: new
            {
                controller = "Product",
                action = "List",
                productPage = 1
            }
        );
        routes.MapRoute(
            name: null,
            template: "{category}",
            defaults: new
            {
                controller = "Product",
                action = "List",
                productPage = 1
            }
        );
        routes.MapRoute(
            name: null,
            template: "",
            defaults: new
            {
                controller = "Product",
                action = "List",
                productPage = 1
            });
        routes.MapRoute(name: null, template: "{controller}/{action}/{id?}");
    });
    SeedData.EnsurePopulated(app);
}
...
表9-1描述了这些路由所代表的 URL 架构。我在第15章和第16章中详细解释了路由系统。
表 9-1:路由摘要
| URL | 导向 |
|---|---|
| / | 列出所有类别产品的第一页。 |
| /Page2 | 列出所有类别产品的指定页(本例为第二页) |
| /Soccer | 显示来自指定类别的项目的第一页(本例为 Soccer 类别) |
| /Soccer/Page2 | 显示来自指定类别(本例为 Soccer 类别)的项目的指定页(本例为第二页) |
MVC 使用 ASP.NET Core 路由系统处理来自客户端的传入请求,但它也生成符合 URL 架构并可嵌入到网页中的传出 URL。通过使用路由系统来处理传入请求和生成传出 URL,我可以确保应用程序中的所有 URL 都是一致的。
IUrlHelper接口提供对 URL 生成功能的访问。我在上一章中创建的标签助手中使用了此接口及其定义的Action方法。现在我想要开始生成更复杂的 URL,我需要一种方法从视图中接收额外的信息,而不必向标签助手类添加其它属性。幸运的是,标签助手有一个很好的特性,它允许在一个集合中一起接收具有公共前缀的属性,如清单9-4所示。
清单 9-4:Infrastructure 文件夹下的 PageLinkTagHelper.cs 文件,接收前缀值
using Microsoft.AspNetCore.Mvc;
using Microsoft.AspNetCore.Mvc.Rendering;
using Microsoft.AspNetCore.Mvc.Routing;
using Microsoft.AspNetCore.Mvc.ViewFeatures;
using Microsoft.AspNetCore.Razor.TagHelpers;
using SportsStore.Models.ViewModels;
using System.Collections.Generic;

namespace SportsStore.Infrastructure
{
    [HtmlTargetElement("div", Attributes = "page-model")]
    public class PageLinkTagHelper : TagHelper
    {
        private IUrlHelperFactory urlHelperFactory;

        public PageLinkTagHelper(IUrlHelperFactory helperFactory)
        {
            urlHelperFactory = helperFactory;
        }

        [ViewContext]
        [HtmlAttributeNotBound]
        public ViewContext ViewContext { get; set; }
        public PagingInfo PageModel { get; set; }
        public string PageAction { get; set; }

        [HtmlAttributeName(DictionaryAttributePrefix = "page-url-")]
        public Dictionary<string, object> PageUrlValues { get; set; }
            = new Dictionary<string, object>();

        public bool PageClassesEnabled { get; set; } = false;
        public string PageClass { get; set; }
        public string PageClassNormal { get; set; }
        public string PageClassSelected { get; set; }

        public override void Process(TagHelperContext context,
        TagHelperOutput output)
        {
            IUrlHelper urlHelper = urlHelperFactory.GetUrlHelper(ViewContext);
            TagBuilder result = new TagBuilder("div");
            for (int i = 1; i <= PageModel.TotalPages; i++)
            {
                TagBuilder tag = new TagBuilder("a");
                PageUrlValues["productPage"] = i;
                tag.Attributes["href"] = urlHelper.Action(PageAction, PageUrlValues);
                if (PageClassesEnabled)
                {
                    tag.AddCssClass(PageClass);
                    tag.AddCssClass(i == PageModel.CurrentPage
                    ? PageClassSelected : PageClassNormal);
                }
                tag.InnerHtml.Append(i.ToString());
                result.InnerHtml.AppendHtml(tag);
            }
            output.Content.AppendHtml(result.InnerHtml);
        }
    }
}
使用HtmlAttributeName特性装饰标签助手属性允许我在元素上指定属性名称的前缀,在本例中,该前缀将是page-url-。名称以此前缀开头的任何特性的值都将添加到字典中,并分配给PageUrlValues属性,然后将该属性传递给IUrlHelper.Action方法,以为标签助手生成的a元素的href属性生成 URL。
在清单9-5中,我向由标签助手处理的div元素添加了一个新属性,指定了将用于生成 URL 的类别。我只向视图添加了一个新属性,但是任何具有相同前缀的属性都将添加到字典中。
清单 9-5:Views/Home 文件夹下的 List.cshtml 文件,添加一个新属性
@model ProductsListViewModel

@foreach (var p in Model.Products)
{
    @await Html.PartialAsync("ProductSummary", p)
}

<div page-model="@Model.PagingInfo" page-action="List" page-classes-enabled="true"
     page-class="btn" page-class-normal="btn-secondary"
     page-class-selected="btn-primary" page-url-category="@Model.CurrentCategory"
        class="btn-group pull-right m-1">
</div>
在此更改之前,为分页链接生成的链接如下:
http://<myserver>:<port>/Page1
如果用户单击这样的页面链接,类别筛选器就会丢失,应用程序将显示一个包含来自所有类别的产品的页面。通过添加来自视图模型的当前类别,我生成如下URL:
http://<myserver>:<port>/Chess/Page1
当用户单击这种链接时,当前类别将被传递给List action 方法,筛选将被保留。在进行此更改后,您可以访问一个 URL,如 /Chess 或 /Soccer,您将看到页面底部的页面链接正确地包含了该类别。
我需要为客户提供一个方法,在选择类别时无需键入 URL。这意味着向他们提供一份现有类别的清单,并表明目前选择了哪些类别。在构建应用程序时,我将在多个控制器中使用这个类别列表,因此我需要一些自包含和可重用的内容。
ASP.NET Core MVC 有 视图组件(view components) 的概念,这些组件非常适合创建项目,如可重用的导航控件。视图组件是一个 C# 类,它提供了少量可重用的应用程序逻辑,可以选择和显示 Razor 分部视图。我在第22章中详细描述了视图组件。
在这种情况下,我将创建一个视图组件来呈现导航菜单,并通过从共享布局调用组件将其集成到应用程序中。这种方法让我通过一个常规的 C# 类,就可以包含我所需要的任何应用程序逻辑,并且可以像任何其他类一样进行单元测试。这是一种很好的方法,可以使用较少的代码从而保持总体 MVC 不变。
我创建了一个名为 Components 的文件夹,它是传统的存放视图组件的地方,并在其中添加了一个名为 NavigationMenuViewComponent.cs 的文件,用于定义哪清单9-6所示的类。
清单 9-6:Components 文件夹下的 NavigationMenuViewComponent.cs 文件的内容
using Microsoft.AspNetCore.Mvc;

namespace SportsStore.Components
{
    public class NavigationMenuViewComponent : ViewComponent
    {
        public string Invoke()
        {
            return "Hello from the Nav View Component";
        }
    }
}
当视图组件在 Razor 视图中使用时会调用Invoke方法,它返回的结果被插入到 HTML 并发送给浏览器。我从一个返回字符串的简单视图组件开始,但很快将用动态 HTML 内容替换它。
我希望类别列表在所有页面显示,所以准备在共享布局中使用视图组件,而不是一个指定视图。在视图中,视图组件通过@await Component.InvokeAsync异步表达式使用,如清单9-7所示。
清单 9-7:Views/Shared 文件夹下的 _Layout.cshtml 文件,使用视图组件
<!DOCTYPE html>

<html>
<head>
    <meta name="viewport" content="width=device-width" />
    <link rel="stylesheet"
          asp-href-include="/lib/twitter-bootstrap/**/*.min.css"
          asp-href-exclude="**/*-reboot*,**/*-grid*" />
    <title>SportsStore</title>
</head>
<body>
    <div class="navbar navbar-inverse bg-inverse" role="navigation">
        <a class="navbar-brand" href="#">SPORTS STORE</a>
    </div>
    <div class="row m-1 p-1">
        <div id="categories" class="col-3">
            @await Component.InvokeAsync("NavigationMenu")
        </div>
        <div class="col-9">
            @RenderBody()
        </div>
    </div>
</body>
</html>
我删除了占位符文本,并将其替换为调用Component.InvokeAsync方法。此方法的参数是组件名称省略了类名的 ViewComponent 部分,如 NavigationMenu 指示 NavigationMenuViewComponent类。如果运行程序,您将看到Invoke方法的输出包含在发送到浏览器的 HTML 中,如图9-2所示。
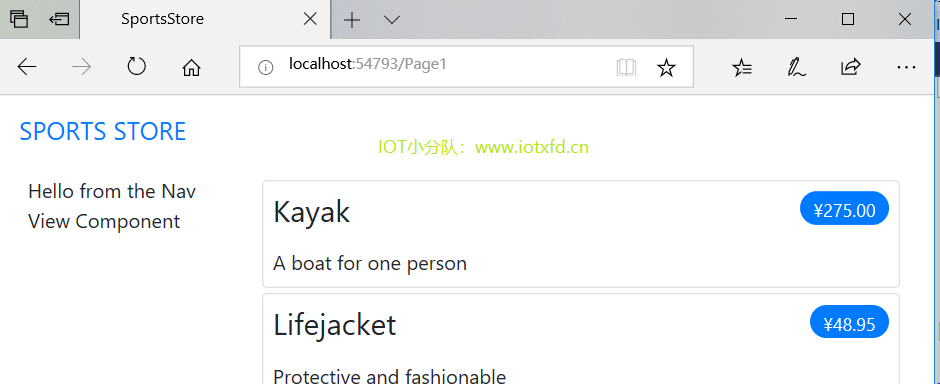 图9-2 使用视图组件
现在我可以返回导航视图控制器并生成一组真正的类别。我可以用编程的方式为类别构建 HTML,就像对页面的标签助手所做的一样,但是使用视图组件的好处之一是它们可以渲染份部视图。这意味着我可以使用视图组件生成组件列表,然后使用更有表现力的 Razor 语法来渲染将显示它们的 HTML。第一步是更新视图组件,如清单9-8所示。
清单 9-8:Components 文件夹下的 NavigationMenuViewComponent.cs 添加类别
using Microsoft.AspNetCore.Mvc;
using System.Linq;
using SportsStore.Models;

namespace SportsStore.Components
{
    public class NavigationMenuViewComponent : ViewComponent
    {
        private IProductRepository repository;

        public NavigationMenuViewComponent(IProductRepository repo)
        {
            repository = repo;
        }

        public IViewComponentResult Invoke()
        {
            return View(repository.Products
                .Select(x => x.Category)
                .Distinct()
                .OrderBy(x => x));
        }
    }
}
清单9-8中的构造方法定义了一个IProductRepository参数,当 MVC 需要创建一个视图组件类实例时,它将注意到需要提供这个参数并检查Startup类中的配置,以确定应该使用哪个实现对象。这和第8章中我在控制器中使用的依赖注入特性相同,它具有相同的效果,即在不知道将使用哪个存储库实现的情况下允许视图组件访问数据,如第18章所述。
在Invoke方法中,我使用 LINQ 选择并排序存储库中的一组类别,并将它们作为参数传递给View方法,该方法渲染默认的 Razor 分部视图,该视图的细节将使用IViewComponentResult对象从该方法中返回,这是我在第22章中详细描述的过程。
单元测试:生成类别列表
单元测试对于我生成类别列表的能力来说是相对简单的。其目标是创建一个按字母顺序排序的列表,该列表不包含副本,最简单的方法是提供一些具有重复类别且不符合顺序的测试数据,将其传递给标记助手类,并断言数据已被正确清理。下面是单元测试,我在 SportsStore.Tests 项目下新建的一个名为 NavigationMenuViewComponentTests.cs 的类文件中对该测试进行了定义。
using System.Collections.Generic;
using System.Linq;
using Microsoft.AspNetCore.Mvc.ViewComponents;
using Moq;
using SportsStore.Components;
using SportsStore.Models;
using Xunit;

namespace SportsStore.Tests
{
    public class NavigationMenuViewComponentTests
    {
        [Fact]
        public void Can_Select_Categories()
        {
            // Arrange
            Mock<IProductRepository> mock = new Mock<IProductRepository>();
            mock.Setup(m => m.Products).Returns((new Product[] {
                new Product {ProductID = 1, Name = "P1", Category = "Apples"},
                new Product {ProductID = 2, Name = "P2", Category = "Apples"},
                new Product {ProductID = 3, Name = "P3", Category = "Plums"},
                new Product {ProductID = 4, Name = "P4", Category = "Oranges"},
            }).AsQueryable<Product>());
            NavigationMenuViewComponent target =
                new NavigationMenuViewComponent(mock.Object);
            // Act = get the set of categories
            string[] results = ((IEnumerable<string>)(target.Invoke()
                as ViewViewComponentResult).ViewData.Model).ToArray();
            // Assert
            Assert.True(Enumerable.SequenceEqual(new string[] { "Apples",
                "Oranges", "Plums" }, results));
        }
    }
}
我创建了一个模拟存储库实现,该实现包含重复的类别和未排序类别。我断言重复项被删除了,并且按字母顺序排列。
Razor 使用不同的约定来处理视图组件所选择的视图。视图的默认名称和搜索视图的位置都与控制器所使用的不同。为此,我创建了 Views/Shared/Components/NavigationMenu 文件夹,并向其添加了一个名为 Default.cshtml 的视图文件,其中添加了清单9-9所示的内容。
清单 9-9:Views/Shared/Components/NavigationMenu 文件夹下的 Default.cshtml 文件的内容
@model IEnumerable<string>

<a class="btn btn-block btn-secondary"
   asp-action="List"
   asp-controller="Product"
   asp-route-category="">
    Home
</a>
@foreach (string category in Model)
{
    <a class="btn btn-block btn-secondary"
       asp-action="List"
       asp-controller="Product"
       asp-route-category="@category"
       asp-route-productPage="1">
        @category
    </a>
}
此视图使用我在第24章和第25章中描述的内置标签助手之一来创建一个元素,其href属性包含选择不同产品类别的 URL。
如果运行应用程序,您可以看到类别链接,如图9-3所示。如果单击某个类别,则项目列表将被更新,仅显示所选类别中的项目。
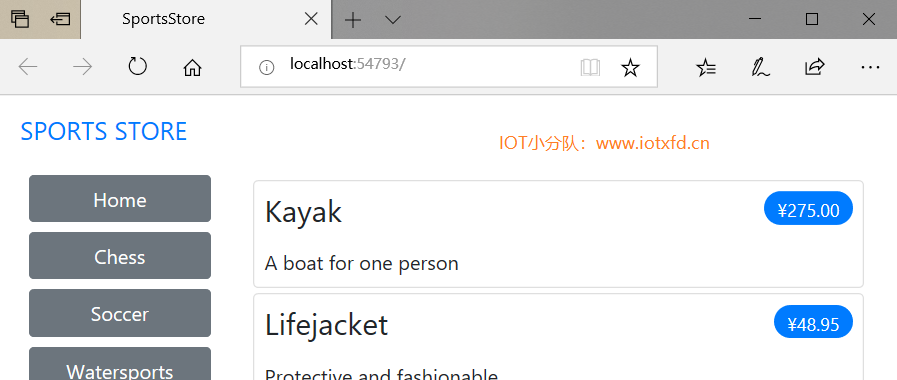 图9-3 使用视图组件生成类别链接
并没有反馈给用户选择了哪个类别。也许可以从列表中的项目中推断出类别,但是一些清晰的视觉反馈似乎是个好主意。ASP.NET Core MVC 组件,如控制器和视图组件可以通过请求上下文对象来接收有关当前请求的信息。大多数时候,您可以依赖于用来创建组件的基类,来获取上下文对象,例如当您使用Controller基类创建控制器时。
ViewComponent基类也不例外,它通过一组属性提供对上下文对象的访问。其中一个属性是RouteData,它提供有关路由系统如何处理请求 URL 的信息。
在清单9-10中,我使用RouteData属性访问请求数据,以便获得当前选定类别的值。我可以通过创建另一个视图模型类将这个类别传递给视图(这是我在实际项目中要做的),但为演示不同情况,我将使用我在第2章中介绍的 view bag 特性。
清单 9-10:NavigationMenuViewComponent.cs 文件,传递被选中的类别
using Microsoft.AspNetCore.Mvc;
using System.Linq;
using SportsStore.Models;

namespace SportsStore.Components
{
    public class NavigationMenuViewComponent : ViewComponent
    {
        private IProductRepository repository;

        public NavigationMenuViewComponent(IProductRepository repo)
        {
            repository = repo;
        }

        public IViewComponentResult Invoke()
        {
            ViewBag.SelectedCategory = RouteData?.Values["category"];
            return View(repository.Products
                .Select(x => x.Category)
                .Distinct()
                .OrderBy(x => x));
        }
    }
}
在Invoke方法中,我动态地为viewbag对象分配了一个SelectedCategory属性,并将其值设置为当前类别,这是通过RouteData属性返回的上下文对象获得的。正如我在第2章中解释的那样,ViewBag是一个动态对象,它允许我简单地通过给它们赋值来定义新属性。
单元测试:报告选定类别
我可以通过在单元测试中读取
ViewBag属性的值来测试视图组件是否正确地添加了所选类别的详细信息,这个值可以通过第22章中描述的ViewViewComponentResult类获得。下面是测试,我将其添加到NavigatioMenuViewComponentTests类中:
...
[Fact]
public void Indicates_Selected_Category()
{
    // Arrange
    string categoryToSelect = "Apples";
    Mock<IProductRepository> mock = new Mock<IProductRepository>();
    mock.Setup(m => m.Products).Returns((new Product[] {
        new Product {ProductID = 1, Name = "P1", Category = "Apples"},
        new Product {ProductID = 4, Name = "P2", Category = "Oranges"},
    }).AsQueryable<Product>());
    NavigationMenuViewComponent target =
        new NavigationMenuViewComponent(mock.Object);
    target.ViewComponentContext = new ViewComponentContext
    {
        ViewContext = new ViewContext
        {
            RouteData = new RouteData()
        }
    };
    target.RouteData.Values["category"] = categoryToSelect;
    // Action
    string result = (string)(target.Invoke() as
        ViewViewComponentResult).ViewData["SelectedCategory"];
    // Assert
    Assert.Equal(categoryToSelect, result);
}
...
此单元测试通过
ViewComponentContext属性为视图组件提供路由数据,这是视图组件接收所有上下文数据的方式。ViewComponentContext属性通过其ViewContext属性提供对特定于视图的上下文数据的访问,而ViewContext属性又通过其RouteData属性提供对路由信息的访问。单元测试中的大多数代码用于创建上下文对象,这些对象将提供所选类别,其方式与在应用程序运行和 ASP.NET Core MVC 提供上下文数据时显示的方式相同。译者注:应加入两个命名空间:
using Microsoft.AspNetCore.Mvc.Rendering;using Microsoft.AspNetCore.Routing;
否则无法识别ViewContext和RouteData属性。
现在已经提供了有关选择哪个类别的信息,我可以更新视图组件所选择的视图以利用这一点,并更改用于对链接进行样式设置的 CSS 类,使表示当前类别的链接与其他类别不同。清单9-11显示了我对 Default.cshtml 文件所做的更改。
清单 9-11:Views/Shared/Components/NavigationMenu 文件夹下的 Default.cshtml 文件,高亮选定
@model IEnumerable<string>

<a class="btn btn-block btn-secondary"
   asp-action="List"
   asp-controller="Product"
   asp-route-category="">
    Home
</a>
@foreach (string category in Model)
{
    <a class="btn btn-block
       @(category == ViewBag.SelectedCategory ? "btn-primary": "btn-secondary")"
       asp-action="List"
       asp-controller="Product"
       asp-route-category="@category"
       asp-route-productPage="1">
        @category
    </a>
}
我在class属性中使用了一个 Razor 表达式来将btn-primary类应用于选中类别元素,其它的应用btn-secondary类。这些类应用不同的 Bootstrap 样式,并使激活按钮变得明显,如图9-4所示。
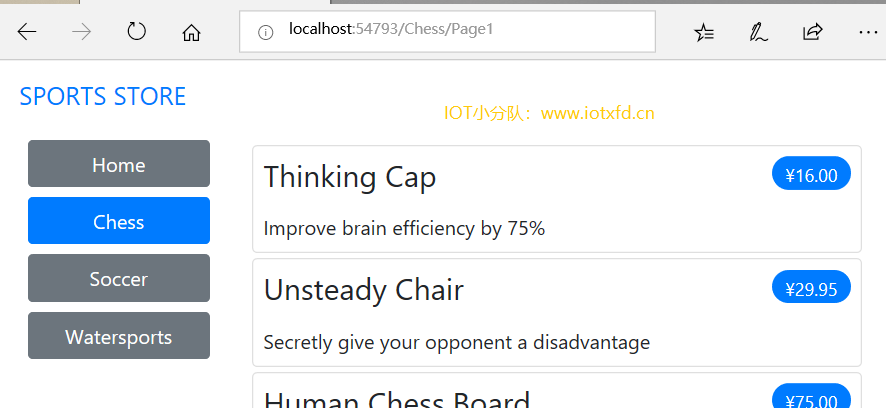 图9-4 高亮选中类别
我需要更正页面链接,以便它们在选择类别时正确工作。目前,页面链接的数量取决于存储库中的产品总数,而不是所选类别中的产品数量。这意味着客户可以单击 Chess 类别的第2页的链接,并得到一个空的页面,因为没有足够的 Chess 产品来填充两页。您可以在图9-5中看到问题。
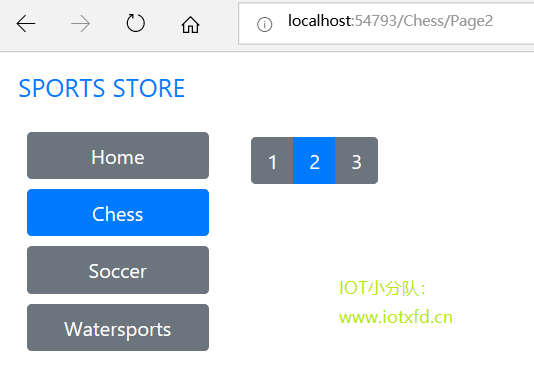 图9-5 选择类别时显示错误的页面链接
我可以通过更新 Product 控制器中的List action 方法来修复这个问题,以便分页信息考虑到类别,如清单9-12所示。
清单 9-12:Controllers 文件夹下的 ProductController.cs 文件,创建类别分页数据
using Microsoft.AspNetCore.Mvc;
using SportsStore.Models;
using System.Linq;
using SportsStore.Models.ViewModels;

namespace SportsStore.Controllers
{
    public class ProductController : Controller
    {
        private IProductRepository repository;
        public int PageSize = 4;
        public ProductController(IProductRepository repo)
        {
            repository = repo;
        }

        public ViewResult List(string category, int productPage = 1)
            => View(new ProductsListViewModel
            {
                Products = repository.Products
                    .Where(p => category == null || p.Category == category)
                    .OrderBy(p => p.ProductID)
                    .Skip((productPage - 1) * PageSize)
                    .Take(PageSize),
                PagingInfo = new PagingInfo
                {
                    CurrentPage = productPage,
                    ItemsPerPage = PageSize,
                    TotalItems = category == null ?
                        repository.Products.Count() :
                        repository.Products.Where(e =>
                            e.Category == category).Count()
                },
                CurrentCategory = category
            });
    }
}
如果选择了某个类别,则返回该类别中的项目数;如果没有,则返回产品总数。现在,当我查看一个类别时,页面底部的链接正确地反映了类别中的产品数量,如图9-6所示。
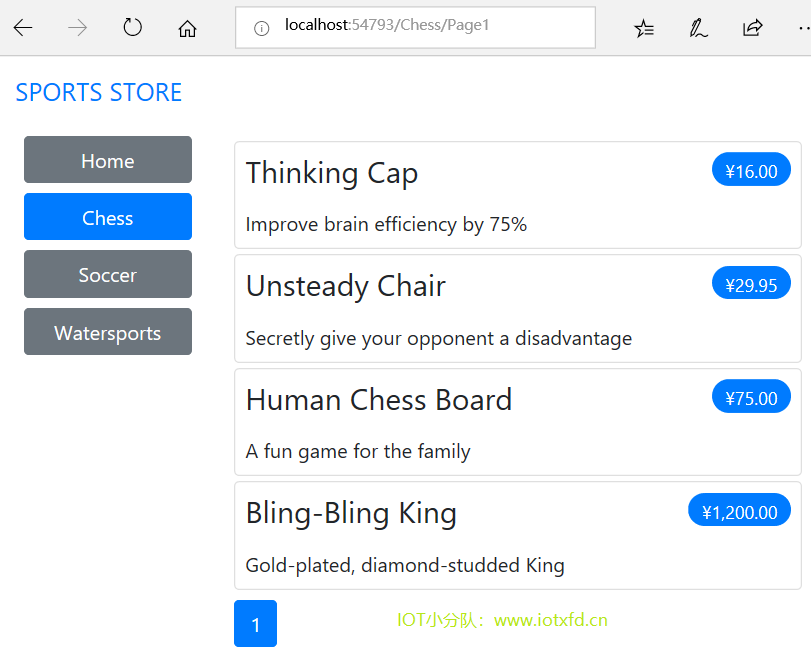 图9-6 显示指定类别的页码
单元测试:指定类别产品数量
测试能够为不同类别生成当前产品数量很简单。我创建了一个模拟存储库,其中包含一系列类别中的已知数据,然后调用
Listaction 方法,请求每个类别。下面是我添加到ProductControllerTests类中的单元测试方法:
...
[Fact]
public void Generate_Category_Specific_Product_Count()
{
    // Arrange
    Mock<IProductRepository> mock = new Mock<IProductRepository>();
    mock.Setup(m => m.Products).Returns((new Product[] {
        new Product {ProductID = 1, Name = "P1", Category = "Cat1"},
        new Product {ProductID = 2, Name = "P2", Category = "Cat2"},
        new Product {ProductID = 3, Name = "P3", Category = "Cat1"},
        new Product {ProductID = 4, Name = "P4", Category = "Cat2"},
        new Product {ProductID = 5, Name = "P5", Category = "Cat3"}
    }).AsQueryable<Product>());

    ProductController target = new ProductController(mock.Object);
    target.PageSize = 3;
    Func<ViewResult, ProductsListViewModel> GetModel = result =>
        result?.ViewData?.Model as ProductsListViewModel;
    // Action
    int? res1 = GetModel(target.List("Cat1"))?.PagingInfo.TotalItems;
    int? res2 = GetModel(target.List("Cat2"))?.PagingInfo.TotalItems;
    int? res3 = GetModel(target.List("Cat3"))?.PagingInfo.TotalItems;
    int? resAll = GetModel(target.List(null))?.PagingInfo.TotalItems;
    // Assert
    Assert.Equal(2, res1);
    Assert.Equal(2, res2);
    Assert.Equal(1, res3);
    Assert.Equal(5, resAll);
}
...
注意,我还调用了
List方法,没有指定任何类别,以确保可以得到了正确的总数。译者注:应加入两个命名空间:
using System;using Microsoft.AspNetCore.Mvc;
否则无法识别Func<>和ViewResult。
应用程序进展良好,但在实现购物车之前,我无法销售任何产品。在本节中,我将创建图 9-7 所示的购物车体验。这对任何曾经在网上购物的人来说都是很熟悉的。
 图9-7 购物车基本流程
【Add to Cart】按钮将显示在目录中的每个产品旁边。单击此按钮将显示客户已选择产品的摘要,包括消费总额。此时,用户可以单击【Continue Shopping】按钮返回产品目录,或者单击【Checkout Now】按钮完成订单并完成购物会话。
我首先将一个名为 Cart.cs 的类文件添加到 Models 文件夹中,并使用它来定义清单9-13所示的类。
清单 9-13:Models 文件夹下的 Cart.cs 文件的内容
using System.Collections.Generic;
using System.Linq;

namespace SportsStore.Models
{
    public class Cart
    {
        private List<CartLine> lineCollection = new List<CartLine>();
        public virtual void AddItem(Product product, int quantity)
        {
            CartLine line = lineCollection
                .Where(p => p.Product.ProductID == product.ProductID)
                .FirstOrDefault();
            if (line == null)
            {
                lineCollection.Add(new CartLine
                {
                    Product = product,
                    Quantity = quantity
                });
            }
            else
            {
                line.Quantity += quantity;
            }
        }
        public virtual void RemoveLine(Product product) =>
            lineCollection.RemoveAll(l => l.Product.ProductID == product.ProductID);
        public virtual decimal ComputeTotalValue() =>
            lineCollection.Sum(e => e.Product.Price * e.Quantity);
        public virtual void Clear() => lineCollection.Clear();
        public virtual IEnumerable<CartLine> Lines => lineCollection;
    }
    public class CartLine
    {
        public int CartLineID { get; set; }
        public Product Product { get; set; }
        public int Quantity { get; set; }
    }
}
Cart类使用同一个文件中定义的CartLine类来表示用户选择的产品和想要购买的数量。我定义了如下方法:将项添加到购物车中、从购物车中删除之前添加的项、计算购物车中项的总金额以及通过删除所有项重置购物车的方法。我还提供了一个属性,它允许使用IEnumerable<CartLine>访问购物车的内容。这些都是直截了当的东西,在少许 LINQ 的帮助下很容易使用 C# 实现。
单元测试:测试购物车
Cart类相对简单,但它有一系列重要的行为,必须正常工作。运行不良的购物车会破坏整个运动商店应用程序。我已经分解了这些功能,并对它们进行了个别测试。我在 SportsStore.Tests 项目中创建了一个名为 CartTests.cs 的新单元测试文件。第一种行为是当我向购物车中添加一项时。如果这是第一次将给定的
Product添加到购物车中,我希望添加一个新的CartLine。下面是测试,包括单元测试类定义:
using System.Linq;
using SportsStore.Models;
using Xunit;
namespace SportsStore.Tests
{
    public class CartTests
    {
        [Fact]
        public void Can_Add_New_Lines()
        {
            // Arrange - create some test products
            Product p1 = new Product { ProductID = 1, Name = "P1" };
            Product p2 = new Product { ProductID = 2, Name = "P2" };
            // Arrange - create a new cart
            Cart target = new Cart();
            // Act
            target.AddItem(p1, 1);
            target.AddItem(p2, 1);
            CartLine[] results = target.Lines.ToArray();
            // Assert
            Assert.Equal(2, results.Length);
            Assert.Equal(p1, results[0].Product);
            Assert.Equal(p2, results[1].Product);
        }
    }
}
但是,如果客户已经向购物车添加了一个
Product,我希望增加相应的CartLine的数量,而不是创建一个新的。下面是测试:
...
[Fact]
public void Can_Add_Quantity_For_Existing_Lines()
{
    // Arrange - create some test products
    Product p1 = new Product { ProductID = 1, Name = "P1" };
    Product p2 = new Product { ProductID = 2, Name = "P2" };
    // Arrange - create a new cart
    Cart target = new Cart();
    // Act
    target.AddItem(p1, 1);
    target.AddItem(p2, 1);
    target.AddItem(p1, 10);
    CartLine[] results = target.Lines
    .OrderBy(c => c.Product.ProductID).ToArray();
    // Assert
    Assert.Equal(2, results.Length);
    Assert.Equal(11, results[0].Quantity);
    Assert.Equal(1, results[1].Quantity);
}
...
我还需要检查用户是否可以改变想法并将产品从购物车中删除。这个功能是由
RemoveLine方法实现的。下面是测试:
...
[Fact]
public void Can_Remove_Line()
{
    // Arrange - create some test products
    Product p1 = new Product { ProductID = 1, Name = "P1" };
    Product p2 = new Product { ProductID = 2, Name = "P2" };
    Product p3 = new Product { ProductID = 3, Name = "P3" };
    // Arrange - create a new cart
    Cart target = new Cart();
    // Arrange - add some products to the cart
    target.AddItem(p1, 1);
    target.AddItem(p2, 3);
    target.AddItem(p3, 5);
    target.AddItem(p2, 1);
    // Act
    target.RemoveLine(p2);
    // Assert
    Assert.Equal(0, target.Lines.Where(c => c.Product == p2).Count());
    Assert.Equal(2, target.Lines.Count());
}
...
我要测试的下一个行为是计算购物车中物品的总成本的能力。下面是对这种行为的测试:
...
[Fact]
public void Calculate_Cart_Total()
{
    // Arrange - create some test products
    Product p1 = new Product { ProductID = 1, Name = "P1", Price = 100M };
    Product p2 = new Product { ProductID = 2, Name = "P2", Price = 50M };
    // Arrange - create a new cart
    Cart target = new Cart();
    // Act
    target.AddItem(p1, 1);
    target.AddItem(p2, 1);
    target.AddItem(p1, 3);
    decimal result = target.ComputeTotalValue();
    // Assert
    Assert.Equal(450M, result);
}
...
最后的测试很简单。我想确保在重新部署时正确删除购物车的内容。下面是测试:
...
[Fact]
public void Can_Clear_Contents()
{
    // Arrange - create some test products
    Product p1 = new Product { ProductID = 1, Name = "P1", Price = 100M };
    Product p2 = new Product { ProductID = 2, Name = "P2", Price = 50M };
    // Arrange - create a new cart
    Cart target = new Cart();
    // Arrange - add some items
    target.AddItem(p1, 1);
    target.AddItem(p2, 1);
    // Act - reset the cart
    target.Clear();
    // Assert
    Assert.Equal(0, target.Lines.Count()); //原文中的此句 Visual Studio 给出警告,应当使用下一句
    // Assert.Empty(target.Lines); //这一句是 Visual Studio 给出的更改建议
}
...
有时,就像在这种情况下,测试类的功能所需的代码比类本身更长、更复杂。不要让它妨碍您编写单元测试。简单类中的缺陷会产生巨大的影响,特别是那些在示例应用程序中扮演重要角色(如 Cart)的类。
我需要编辑 Views/Shared/ProductSummary.cshtml 分部视图以向产品列表添加按钮。为此,我在 Infrastructure 文件夹中添加了一个名为 UrlExtensions.cs 的类文件,并定义了清单9-14所示的扩展方法。
清单 9-14:Infrastructure 文件夹下的 UrlExtensions.cs 文件的内容
using Microsoft.AspNetCore.Http;

namespace SportsStore.Infrastructure
{
    public static class UrlExtensions
    {
        public static string PathAndQuery(this HttpRequest request) =>
            request.QueryString.HasValue
                ? $"{request.Path}{request.QueryString}"
                : request.Path.ToString();
    }
}
PathAndQuery扩展方法作用于HttpRequest类,ASP.NET 使用该类来描述 HTTP 请求。扩展方法生成一个 URL,在购物车更新后浏览器将返回该 URL,如果存在查询字符串,则使用它。在清单9-15中,我将包含扩展方法的命名空间添加到视图导入文件中,以便在分部视图中使用它。
清单 9-15:Views 文件夹下的 _ViewImports.cshtml 文件,添加命名空间
@using SportsStore.Models
@using SportsStore.Models.ViewModels
@using SportsStore.Infrastructure
@addTagHelper *, Microsoft.AspNetCore.Mvc.TagHelpers
@addTagHelper SportsStore.Infrastructure.*, SportsStore
在清单9-16中,我更新了分部视图,它让每个产品包含一个【Add To Cart】按钮。
清单 9--16:Views/Shared 文件夹下的 ProductSummary.cshtml 文件,添加按钮
@model Product

<div class="card card-outline-primary m-1 p-1">
    <div class="bg-faded p-1">
        <h4>
            @Model.Name
            <span class="badge badge-pill badge-primary" style="float:right">
                <small>@Model.Price.ToString("c")</small>
            </span>
        </h4>
    </div>
    <form id="@Model.ProductID" asp-action="AddToCart"
          asp-controller="Cart" method="post">
        <input type="hidden" asp-for="ProductID" />
        <input type="hidden" name="returnUrl"
               value="@ViewContext.HttpContext.Request.PathAndQuery()" />
        <span class="card-text p-1">
            @Model.Description
            <button type="submit"
                    class="btn btn-success btn-sm pull-right" style="float:right">
                Add To Cart
            </button>
        </span>
    </form>
</div>
我添加了一个form元素,它包含隐藏的input元素,指定视图模型中的ProductID值,以及在购物车更新后浏览器应该返回的 URL。form元素和其中一个input元素使用内置标签助手进行配置,标签助手非常有用,它所生成的表单包含了模型值以及针对应用程序的控制器和 action,如第24章所述。另一个input元素使用我创建的扩展方法来设置返回 URL。我还添加了一个button元素,它将把表单提交给应用程序。
注意:我将
form元素上的method属性设置为post,它指示浏览器使用 HTTP POST 请求提交表单数据。您可以更改它让表单使用GET方法,但做之前应该考虑清楚。HTTP 规范要求GET请求必须是幂等操作,这意味着它们不能引发更改,将产品添加到购物车肯定是一种改变。我在第16章中对这个主题有更多的解释,包括解释如果您忽略了幂等GET请求的需求时会发生什么。
我将使用会话状态存储用户购物车的详细信息,会话状态是存储在服务器上并与用户提出的一系列请求相关联的数据。ASP.NET 提供了一系列存储会话状态的不同方法,包括将其存储在内存中,这是我将要使用的方法。它的优势是简单,但意味着会话数据在应用程序停止或重新启动时丢失。启用会话需要在Startup类中添加服务和中间件,如清单9-17所示。
清单 9-17:SportsStore 文件夹下的 Startup.cs 文件,启用会话
using System;
using System.Collections.Generic;
using System.Linq;
using System.Threading.Tasks;
using Microsoft.AspNetCore.Builder;
using Microsoft.AspNetCore.Hosting;
using Microsoft.AspNetCore.Http;
using Microsoft.Extensions.DependencyInjection;
using SportsStore.Models;
using Microsoft.Extensions.Configuration;
using Microsoft.EntityFrameworkCore;

namespace SportsStore
{
    public class Startup
    {
        public Startup(IConfiguration configuration) =>
            Configuration = configuration;

        public IConfiguration Configuration { get; }

        public void ConfigureServices(IServiceCollection services)
        {
            services.AddDbContext<ApplicationDbContext>(options =>
                options.UseSqlServer(
                    Configuration["Data:SportStoreProducts:ConnectionString"]));
            services.AddTransient<IProductRepository, EFProductRepository>();
            services.AddMvc();
            services.AddMemoryCache();
            services.AddSession();
        }

        public void Configure(IApplicationBuilder app, IHostingEnvironment env)
        {
            app.UseDeveloperExceptionPage();
            app.UseStatusCodePages();
            app.UseStaticFiles();
            app.UseSession();
            app.UseMvc(routes =>
            {
                //...为简洁起见,省略路由配置
            });
            SeedData.EnsurePopulated(app);
        }
    }
}
AddMemoryCache方法调用设置内存数据存储区。AddSession方法注册用于访问会话数据的服务,而UseSession方法允许会话系统在请求从客户端到达时自动将请求与会话相关联。
我需要一个控制器来处理【Add to Cart】按钮的单击。我在 Controllers 文件夹中添加了一个名为 Controllers.cs 的新类文件,并使用它来定义清单9-18所示的类。
清单 9-18:Controllers 文件夹下的 CartController.cs 文件的内容
using System.Linq;
using Microsoft.AspNetCore.Http;
using Microsoft.AspNetCore.Mvc;
using SportsStore.Infrastructure;
using SportsStore.Models;
namespace SportsStore.Controllers
{
    public class CartController : Controller
    {
        private IProductRepository repository;
        public CartController(IProductRepository repo)
        {
            repository = repo;
        }
        public RedirectToActionResult AddToCart(int productId, string returnUrl)
        {
            Product product = repository.Products
                .FirstOrDefault(p => p.ProductID == productId);
            if (product != null)
            {
                Cart cart = GetCart();
                cart.AddItem(product, 1);
                SaveCart(cart);
            }
            return RedirectToAction("Index", new { returnUrl });
        }
        public RedirectToActionResult RemoveFromCart(int productId,
            string returnUrl)
        {
            Product product = repository.Products
            .FirstOrDefault(p => p.ProductID == productId);
            if (product != null)
            {
                Cart cart = GetCart();
                cart.RemoveLine(product);
                SaveCart(cart);
            }
            return RedirectToAction("Index", new { returnUrl });
        }
        private Cart GetCart()
        {
            Cart cart = HttpContext.Session.GetJson<Cart>("Cart") ?? new Cart();
            return cart;
        }
        private void SaveCart(Cart cart)
        {
            HttpContext.Session.SetJson("Cart", cart);
        }
    }
}
关于这个控制器有几点需要注意。首先,我使用 ASP.NET 会话状态功能来存储和检索Cart对象,这就是GetCart方法的目的。我在上一节中注册的中间件使用 cookies 或 URL 重写将来自用户的多个请求关联在一起形成一个单一的浏览会话。一个相关的功能是会话状态,它将数据与会话相关联。这是Cart类的理想选择:我希望每个用户都有自己的购物车,我还希望购物车在请求之间保持持久。与会话关联的数据在会话过期时被删除(通常是因为用户暂时没有提出请求),这意味着我不需要管理Cart对象的存储或生命周期。
对于AddToCart和RemoveFromCart action 方法,我使用的参数名与 ProductSummary.cshtml 视图中创建的 HTML 表单中的input元素相匹配。它使得 MVC 将传入的表单 POST 变量与这些参数关联起来,这意味着我不需要自己处理表单。正如我在第26章中所解释的,这被称为模型绑定,是简化控制器类的强大工具。
ASP.NET Core 的会话状态功能仅存储int、string和byte[]值。由于我要存储的是Cart对象,所以需要为ISession接口定义扩展方法,它提供对会话状态数据的访问,以将Cart对象序列化为 JSON 并将它们转换回来。我在 Infrastructure 文件夹中添加了一个名为 SessionExtensions.cs 的类文件,并定义了清单9-19所示的扩展方法。
清单 9-19:Infrastructure 文件夹下的SessionExtensions.cs 文件的内容
using Microsoft.AspNetCore.Http;
using Newtonsoft.Json;
namespace SportsStore.Infrastructure
{
    public static class SessionExtensions
    {
        public static void SetJson(this ISession session, string key, object value)
        {
            session.SetString(key, JsonConvert.SerializeObject(value));
        }
        public static T GetJson<T>(this ISession session, string key)
        {
            var sessionData = session.GetString(key);
            return sessionData == null
                ? default(T) : JsonConvert.DeserializeObject<T>(sessionData);
        }
    }
}
些方法依赖于 Json.Net 包将对象序列化为 JavaScript 对象标记格式,您将在第20章中再次遇到这种格式。不需要将 Json.Net 包添加到项目中,因为 MVC 已经在幕后使用它来提供 JSON 助手功能,如第21章所述。(参考www.newtonsoft.com/json获取有关直接使用 Json.Net 的信息)
扩展方法使存储和检索Cart对象变得很容易。要将购物车添加到控制器中的会话状态,我进行了如下分配:
...
HttpContext.Session.SetJson("Cart", cart);
...
HttpContext属性由Controller基类提供,控制器通常从该基类派生,并返回HttpContext对象,该对象提供有关已接收的请求和正在准备的响应的上下文数据。HttpContext.Session属性返回一个实现ISession接口的对象,该对象是我定义SetJson方法使用的类型,它接受指定键和将添加到会话状态的对象的参数。扩展方法序列化对象,并使用ISession接口提供的底层功能将其添加到会话状态。
为取回Cart,我使用了另一个扩展方法,指定相同的键,如下所示:
...
Cart cart = HttpContext.Session.GetJson<Cart>("Cart");
...
类型参数允许我指定希望检索的类型,该类型用于反序列化过程。
关于购物车控制器的最后一点要注意的是,AddToCart和RemoveFromCart方法都调用RedirectToAction方法。这样做的效果是向客户端浏览器发送 HTTP 重定向指令,要求浏览器请求一个新的 URL。在这种情况下,我已经要求浏览器请求一个 URL 来调用购物车控制器的Index action 方法。
我将来实现Index方法并用它显示购物车的内容。如果您往回查看图9-7,将会看到这是当用户单击【Add to Cart】按钮时的流程。
我需要向视图传递两条信息,以显示购物车的内容:Cart对象和用户单击【Continue Shopping】按钮时显示的 URL。我在 SportsStore 项目的 Models/ViewModels 文件夹中创建了一个名为 CartIndexViewModel.cs 的新类文件,并使用它来定义清单9-20所示的类。
清单 9-20:Models/ViewModels 文件夹下的 CartIndexViewModel.cs 文件的内容
using SportsStore.Models;

namespace SportsStore.Models.ViewModels
{
    public class CartIndexViewModel
    {
        public Cart Cart { get; set; }
        public string ReturnUrl { get; set; }
    }
}
现在我已经有了视图模型,可以在购物车控制器类中实现Index action 方法了,如清单9-21所示。
清单 9-21:Controllers 文件夹下的 CartController.cs 文件,实现 Index Action 方法
using System.Linq;
using Microsoft.AspNetCore.Http;
using Microsoft.AspNetCore.Mvc;
using SportsStore.Infrastructure;
using SportsStore.Models;
using SportsStore.Models.ViewModels;

namespace SportsStore.Controllers
{
    public class CartController : Controller
    {
        private IProductRepository repository;
        public CartController(IProductRepository repo)
        {
            repository = repo;
        }

        public ViewResult Index(string returnUrl)
        {
            return View(new CartIndexViewModel
            {
                Cart = GetCart(),
                ReturnUrl = returnUrl
            });
        }

        //...为简明起见,其实方法省略
    }
}
Index action 从会话状态检索Cart对象,并使用它创建一个CartIndexView模型对象,然后将该对象传递给View方法作为视图模型。
显示购物车内容的最后一步是创建Index action 将渲染的视图。我创建了 Views/Cart 文件夹,并向其添加了一个名为 Index.cshtml 的 Razor 视图文件,其标记如清单9-22所示。
清单 9-22:Views/Cart 文件夹下的 Index.cshtml 文件的内容
@model CartIndexViewModel

<h2>Your cart</h2>
<table class="table table-bordered table-striped">
    <thead>
        <tr>
            <th>Quantity</th>
            <th>Item</th>
            <th class="text-right">Price</th>
            <th class="text-right">Subtotal</th>
        </tr>
    </thead>
    <tbody>
        @foreach (var line in Model.Cart.Lines)
        {
            <tr>
                <td class="text-center">@line.Quantity</td>
                <td class="text-left">@line.Product.Name</td>
                <td class="text-right">@line.Product.Price.ToString("c")</td>
                <td class="text-right">
                    @((line.Quantity * line.Product.Price).ToString("c"))
                </td>
            </tr>
        }
    </tbody>
    <tfoot>
        <tr>
            <td colspan="3" class="text-right">Total:</td>
            <td class="text-right">
                @Model.Cart.ComputeTotalValue().ToString("c")
            </td>
        </tr>
    </tfoot>
</table>
<div class="text-center">
    <a class="btn btn-primary" href="@Model.ReturnUrl">Continue shopping</a>
</div>
视图枚举购物车中的行,并将每一行的行添加到 HTML 表中,以及每行的总金额和购物车的总金额。我分配给元素的类对应于表和文本对齐的 Bootstrap 样式。
购物车的基本功能已经到位。首先,列出了产品并伴随一个将它们添加到购物车中的按钮,如图9-8所示。
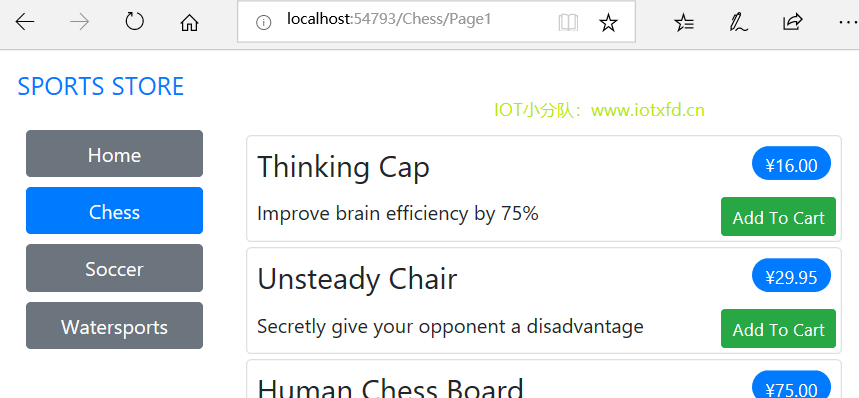 图9-8 【Add to Cart】按钮
其次,当用户单击【Add to Cart】按钮时,对应的产品被添加到他们的购物车中,并且显示购物车的摘要,如图9-9所示。单击【Continue Shopping】按钮将用户返回到他们来时的产品页面。
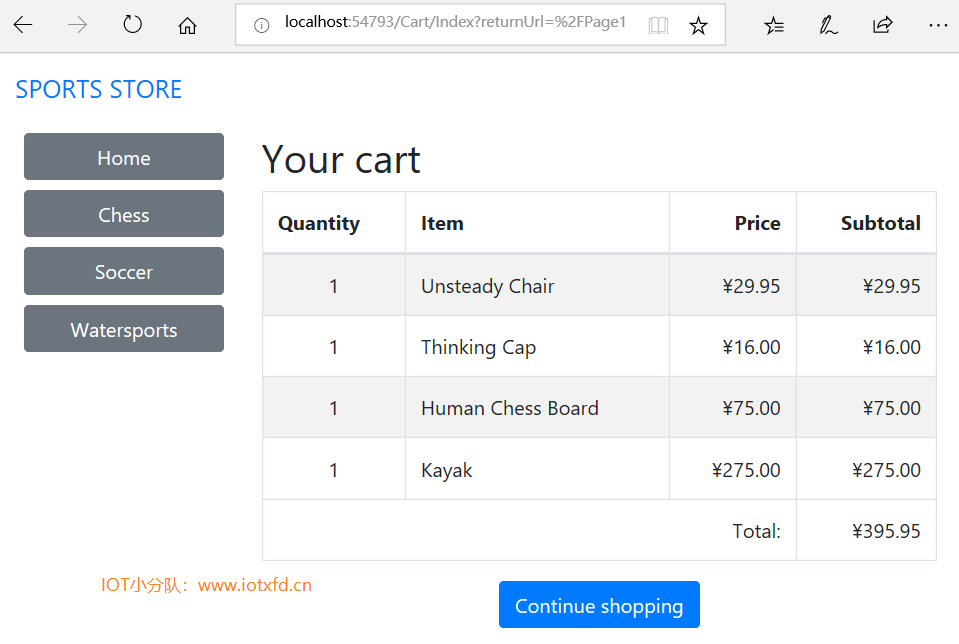 图9-9 显示购物车内容.
在本章中,我开始充实运动商店的面向客户部分。我提供了用户可以按类别导航的方法,将基本的构建块放置到位,以便将项目添加到购物车中。我还有更多的工作要做,并在下一章继续开发应用程序。
;